|
|
EJMS Tutorial
October 2007
1 General instructions
1.1 What is EJMS?
Electronic Journal Management System (EJMS) is offered to help Editors
manage submissions as well as track the peer-review process and report
statistics. It is a web-based service that can be accessed from any
computer on the Internet and works on multiple platforms. It is not
necessary to have a staff to support the Editor. Any required assistance is
provided by MPS/VTEX.
1.2 Main EJMS features
- Allows authors to submit and track their manuscripts and revisions online.
- Allows editors, associate editors and referees to manage and review submissions as well as register reports online.
- Allows editor’s assistant to simulate all actions of those authors, associate editors and referees who do not access or use the system.
- Uses e-mail to communicate with authors, associate editors and referees; in particular, to inform about necessity to perform actions within the system.
- Is partially configurable to meet the journal workflow.
As a result, the system
- Reduces Editorial Office shipping costs.
- Reduces peer-review turn-around time.
1.3 Possible user roles and workflows
EJMS users may have the following roles: Author,
Editor-in-Chief, Editor, Associate Editor (AE),
Referee and Journal Manager. In different journals the
people who take up these roles may be called differently. For example,
an Executive Editor of some journal may correspond to Editor in EJMS,
and an Editor of other journal may correspond to Associate Editor in
EJMS.
EJMS supports journals with 2-, 3- and 4-level peer-review workflow:
- 2-level journal
- involves just two roles in peer review:
Editor and Associate Editors (Editorial Board). The
Associate Editors in the same time play the role of
Referees. Editor makes his immediate decision on a
submission or asks for recommendations of one or more Associate
Editors.
- 3-level journal
- with three roles: Editor, Associate
Editors (Editorial Board) and Referees. Editor assigns a
submission to Associate Editor or makes his decision on a
submission by himself. Associate Editor sends his recommendation
to Editor immediately or assigns one, two or more Referees.
Referee does exhaustive submission review and sends his report
as well as his comments to Associate Editor.
- 4-level journal
- involves four roles: Editor-in-Chief,
Section (or Area) Editors, Associate Editors
and Referees. Editor-in-Chief makes his decision on a
submission by himself or assigns Section Editor for it. Section
Editor usually acts in the same way as Editor in 3-level
journal. He can make the final decision by himself or assign an
Associate Editor.
Selection of the most appropriate EJMS configuration for a particular
journal is a responsibility of Journal Manager (usually the journal
Editor or Editor’s Assistant). It can be done by choosing the appropriate
journal settings.
1.3.1 Three-level workflow within EJMS
Further in this document we will refer to 3-level journals, i.e.,
Editor–Associate Editor–Referee configuration.
The principal scheme of the workflow is presented in Figure 1.1.
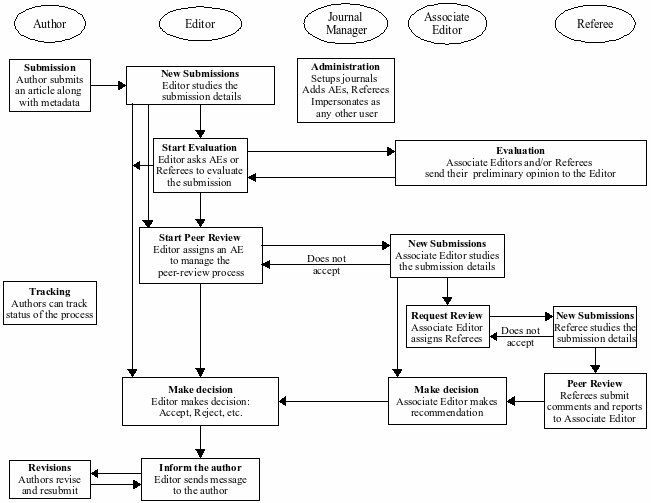
Figure 1.1: Workflow scheme of 3-level journal Editorial Office.
After an Author submits (online) his paper to a certain journal and an
Editor is informed about this paper, then the Editor can either:
- make his decision immediately (e.g., accept or reject);
- start a peer-review process by assigning the submission to an
Associate Editor, who will manage the review;
- start evaluation of the submission if its subject is not
clear enough.
In the last case, the Editor usually asks (in the system terms - assigns
tasks to) several Associate Editors or Referees to evaluate in
two weeks if it is worth starting the peer-review process of this
submission or if it should be rejected immediately. The Associated Editors or
Referees have to respond as soon as possible and tell whether they accept the assigned
task or not (this behavior is expected in any case of task assignment).
If Associate Editor accepts the task to manage the review, he has to prepare a recommendation within a reasonable time
(in the system terms - until the due date). For this task, the Associate
Editor can invite 1-2 Referees in order to obtain their reviews and
recommendations and then derive his own recommendation based on those.
When the Editor receives the Associate Editor’s recommendation and
comments, he makes his own decision. If submission requires a minor or
major revision, the Editor gives a defined amount of time for the Author to
prepare a revised version.
When the Editor receives the revised version, he starts round two of the
peer-review process. Once again, the Editor can make his immediate decision or
assign an Associate Editor (usually the same one as in the first round) to obtain
a recommendation. The Associate Editor, in his turn, can make a
recommendation immediately or invite the same or new Referees to review the
revised version. After receiving the Associate Editor’s recommendation, the
Editor makes the final decision on current submission or asks the Author for a new revision.
Usually such a peer-review process takes two, sometimes three rounds (the
number of rounds is unlimited in EJMS).
1.5 Using the EJMS
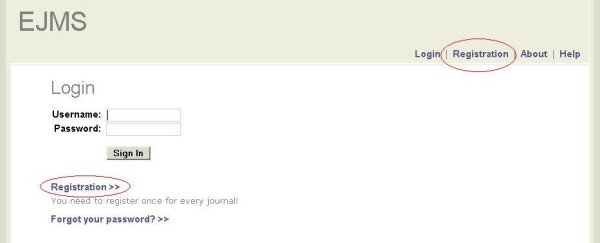
1.5.1 Logging in
To log in, enter your Username and Password in the
appropriate fields on the main screen and click on Sign In button below
the password field (see Figure 1.2). You will be brought to the user’s
Home screen where you will see the title of the journal you are
dealing with and your roles in it.
Recovering password: if you have forgotten the username and/or the password, then click on
Forgot your password? in Login screen (see
Figure 1.2) and enter the e-mail address which was registered in EJMS.
The username and a new password will be sent to you by e-mail.
1.5.2 Logging out
You can log out at any time by clicking on Sign-Out link in the
top right corner of the screen and then clicking OK in the confirmation
window. This will take you back to the Login screen.
1.5.3 Accessing submissions
For a routine work within EJMS, common sequence of steps after log-in is the
following:
- select a role (see Figure 1.6)
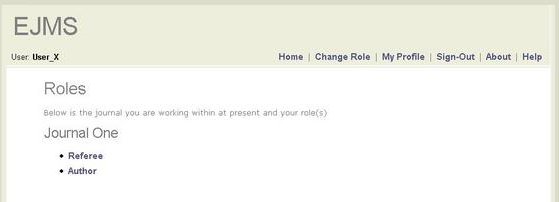
Figure 1.6: Role selection screen.
- select a list of submissions – see Figure 2.1 for example;
- select a submission from the list (see Figure 1.8);
- select a task.
These steps lead top-down into natural organizational structure of notions,
which can be best explained in the bottom-up fashion as follows.
- Single submission.
Most of the tasks are related to single
submissions and are accessible from screens of those single submissions. Many
tasks are role- and stage-dependent and appear only in appropriate
stages. They are desribed in other sections.
The top level choice provided in a single submission’s screen is
shown as a tab bar (see Figure 1.7), which can offer the
following options:

Figure 1.7: Tab bar in the screen of a single submission.
- view Details of the submission, access the manuscript and supplementary files (if any);
- take actions related with the Review process of the submission;
- view the History of actions and decisions made in previous rounds;
- view the composed E-mails.
Buttons for other tasks, which are stage-dependent, appear below the
task bar after task Review is selected.
- Stage.
Single submissions that are at the same stage of the
peer-review workflow are grouped into sets (shown as lists); for
convenience, some sets are unified into larger supersets.
Each submission in a list screen is presented by several lines, with less
information in the beginning and more as the review process progresses (see
Figure 1.8). The most important thing to remember is pointed
out by the arrow: the shaded ID of the submission, an active area -
by clicking it you will reach the individual screen of the submission.
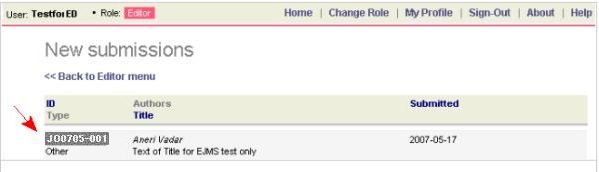
Figure 1.8: A submission in a list.
- Role.
- For a particular user role, just relevant stages of workflow
are shown - more for editors and much less for authors
(more details in the sections for particular roles, see Figures 2.1 3.1.)
2. Editor’s Guide
2.1 All submissions
Once you have logged into the system and selected the Editor role,
you are brought to Submissions screen (see Figure 2.1).
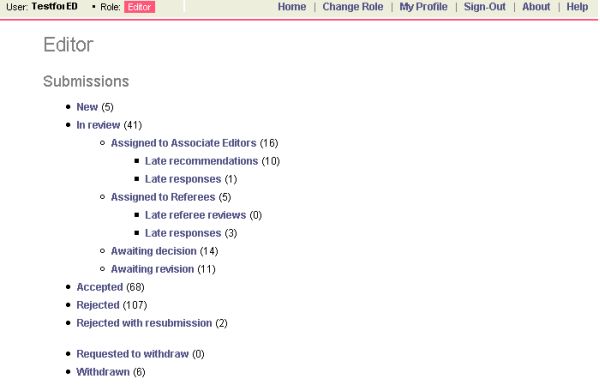
Figure 2.1: Submissions screen for Editor role.
On the Editor’s Submissions screen you can see names of
several lists, where all the manuscripts are grouped by their status:
the New ones, just submitted by authors and without further
actions registered in the system;
the ones already (or still) In Review process; this list is
subdivided into four groups, as the indentation of names shows:
Assigned to Associate Editors, with two categories between them also shown separately, like requiring special attention because of late reactions:
- the ones waiting Late recommendations (the due date is passed) or
- waiting Late responses about acceptance (or rejection) of the task;
Assigned to Referees by yourselves; also have two subcategories with late reactions shown separately:
- waiting Late referee reviews or
- Late responses about taking up tasks;
Awaiting decision means that the associate editors and/or referees have already submitted their recommendations;
Awaiting revision of the authors to be submitted after your decision to accept the submission after improvements are made;
Accepted (finally) to publication in the Journal;
Rejected after peer review or without it;
Rejected with resubmission, if the Journal policy
allows such cases;
Requested to withdraw by the authors (but not yet
withdrawn);
Withdrawn for some reason.
After an author submits the manuscript to the system, it first appears in
the New submissions list (the Editor is informed by
e-mail).
Once the review process has begun, the submission can be accessed from the
New list on Submissions screen and from one of its
sublists. No matter which list you will use to reach the submission, the
information and actions, that could be initiated from its screen, will be
the same and depend only on the status of the submission.
2.2 Access a submission
The lists of submissions inside the groups look very similar and the
actions that have to be done in order to find detailed information are the same:
click on ID. Figure 2.2 shows an example.
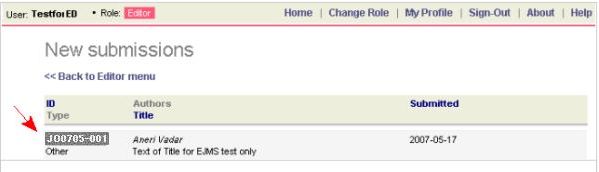
Figure 2.2: Select a new submission.
2.2.1 View details
At first, you might go through the full metadata and reach the manuscript
file by clicking on Details bar.
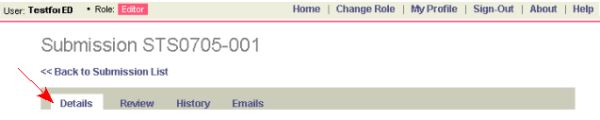
Figure 2.3: Click on Details bar.
You will find all the information the author has provided on the submission.
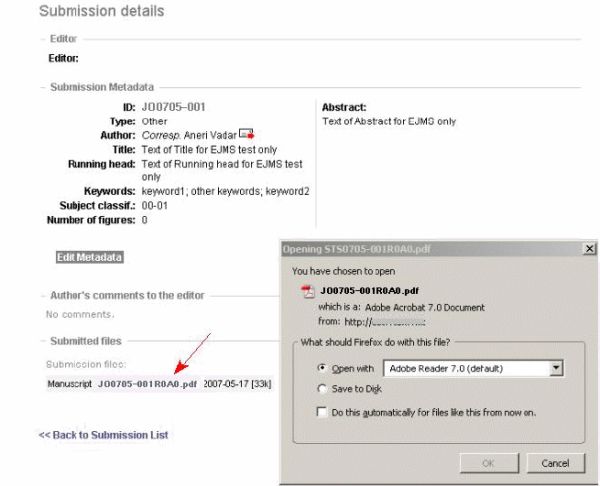
Figure 2.4: View details of the submission and access files.
Opening manuscript: You may download the manuscript (and other submission files) from this
screen by clicking on its name (pointed by the arrow in Figure 2.4).
It is possible to save it to your local disk for printing and reading.
Editing metadata: Submission’s metadata may be accessed from Submission details
screen by clicking on Edit Metadata button. The editing form like
in Figure 2.5 will be opened. If you change any information, then press Save
button. If no changes need to be saved, then press Cancel.
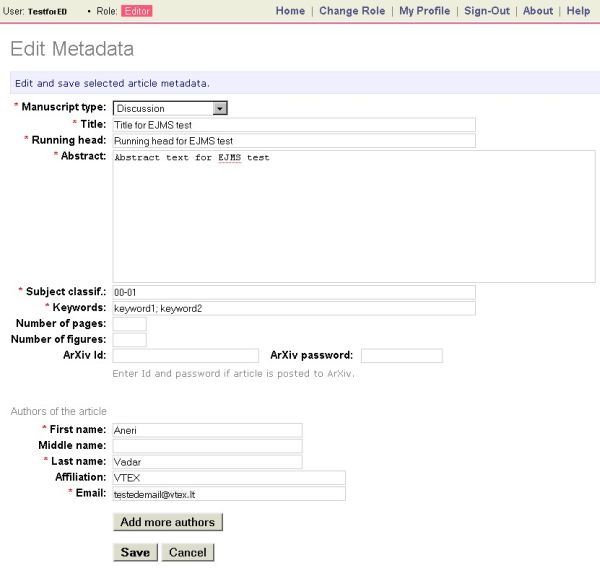
Figure 2.5: Editor can edit metadata.
2.2.2 Review actions
Review tab in Submission screen is for organization of
review process (see Figure 2.6). For a new submission, it
contains these buttons:
- Begin Review
- -to start manuscript review process;
- Report Decision
- -to report a decision (see Section 2.8.2);
- Withdraw submission
- -to withdraw the submission, for example, if authors are asking for that.
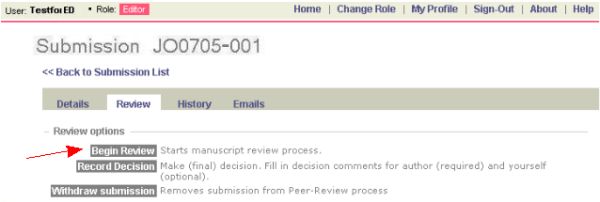
Figure 2.6: Review screen for a new submission.
Begin Review: Begin Review button, when pressed, opens more
options (see Figure 2.7):
- Assign Associate Editor
- -to request an associate editor to manage the review and provide a recommendation (see Section 2.3);
- Request new review
- -to invite a referee to review the paper (Section 2.4) directly, like associate editors do;
- Manage report files
- -to indicate which reports, written by you, associate editors or referees and submitted to EJMS, will be accessible for authors (see Section 2.6).
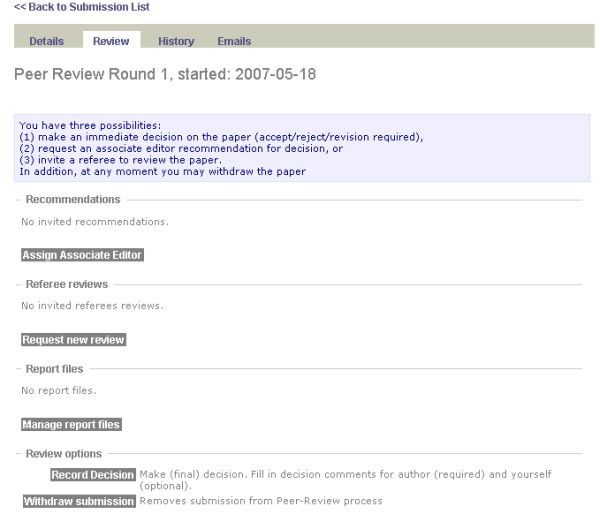
Figure 2.7: Start of a review for a new submission.
All these possibilities are described in the following sections. When any of
the actions shown in Figure 2.7 will be performed, the
submission will no longer be New. It will become accessible through
another list category in the Submissions screen (Figure 2.1).
2.3 Assign Associate Editor
Clicking Assign Associate Editor will show the list of
associate editors (see Figure 2.8). In order to choose one,
click Select on the same line as the editor’s name.
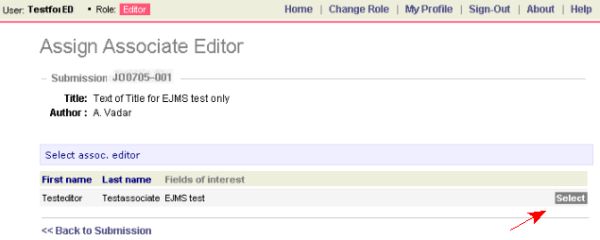
Figure 2.8: Select an Associate Editor from a list.
The selected associate editor should send back a recommendation in
established time, therefore the task defines a due date.
2.3.1 Establish due date for recommendation
The form for changing the due date is opened after selection of an
associate editor, see Figure 2.9. The field Due
contains the date, calculated by adding the default amount of time to the
current date. If needed, you are able to change the date for a recommendation completion.
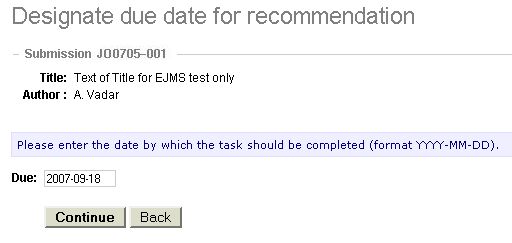
Figure 2.9: Change or confirm the due date.
2.3.2 Edit message to the associate editor
The associate editor is informed by e-mail. The message text is opened for
editing after clicking on Continue button.
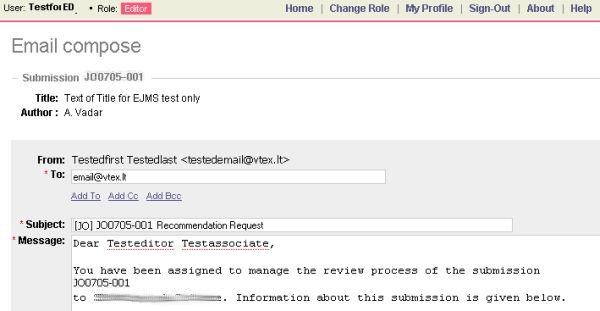
Figure 2.10: Editing text template of e-mail message for the selected associate editor.
You can add more addresses to to or cc fields and edit the message body.
There is also a possibility not to send these system generated messages at all, if you so
prefer.
2.3.3 Cancel or update the task
After assigning the task, you have to wait for an answer about
acceptance/rejection of this task. If the Associate Editor does not answer
for too long, you may cancel this task (after canceling the task you may
also delete it from the the list of the tasks). After that a new assignment
of an Associate Editor can be made.
If the task requires more time, you also have the possibility to change the due date.
2.4 Request a new review
To invite a referee to review a submission, you have to:
- open the screen of that submission (see Section 1.5.3);
- select the Review tab;
- click on Request new review (see Figure 2.11).
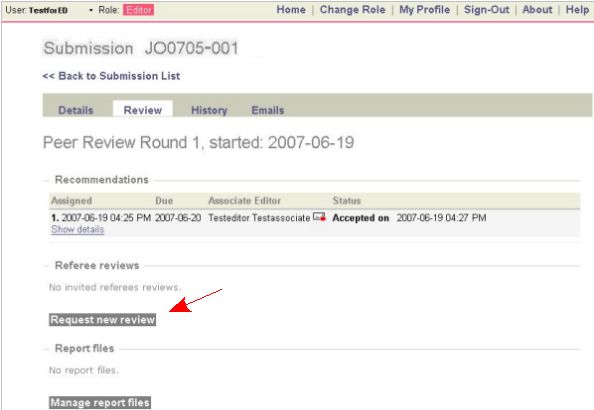
Figure 2.11: Request new review is used for inviting a referee.
EJMS helps to find a referee who is already registered in the
system. It is possible to search for persons using names or parts of e-mail addresses.
Also you may maintain your own list of referees within the system.
If you know someone who could be a referee, you can use the address and the
name to invite him. To make the review process easier, such invited referee
has the possibility to access the particular submission and send in reports
without registering in the system.
2.4.1 Invite a registered referee
EJMS allows for you to make a separate list of referees for the specific area that you
are interested in. When looking for a referee, you can ask the system:
- to show your sublist of referees;
- to show all referees registered in the system;
- to search among registered referees by typing either their first or last name or a part of their e-mail address.
In any case, either a list of referees will be shown, or a message will
appear informing that no referees were found. If you find the right
referee in the list, click Select at the end of the
respective line (see Figure 2.12).
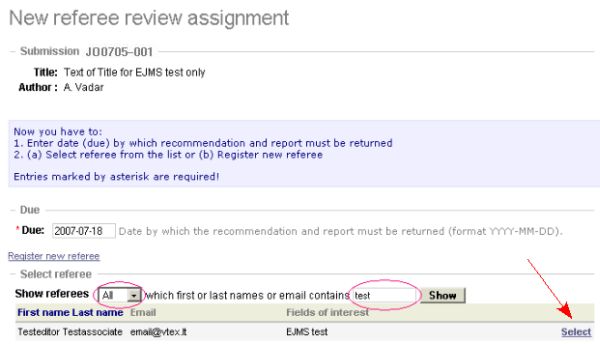
Figure 2.12: Select a referee from a list.
2.4.2 Invite an unregistered referee
It is possible to contact a person who is not registered in the system
by sending an invitation message from EJMS. Click on Register new referee
link, as shown in Figure 2.13.
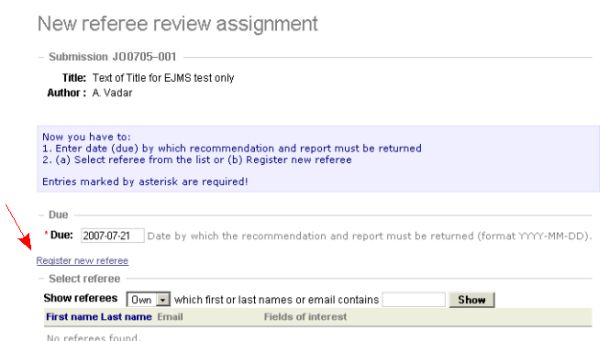
Figure 2.13: Invite a new referee.
In the presented form (see Figure 2.14), fill in the fields
marked with an asterisk and click on Continue button.
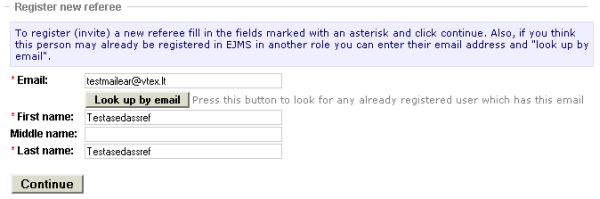
Figure 2.14: Invite an unregistered referee.
Also, you may check if the person is registered in EJMS while being in any other role
- just enter a known e-mail address and click on Look up by email
button. If the search was successful, the fields First name,
Middle name and Last name will be filled in automatically.
After clicking on Continue button, the system will open an e-mail
message template which can be edited as usual.
2.4.3 Editing an invitation e-mail to the referee
The assignment of the referee is already registered in the system and now
you can edit the message; it already contains the due date for the
review completion, ID of the submission and a link to the submission in
the system (see Figure 2.15). You can edit the text, add cc
or to addresses.
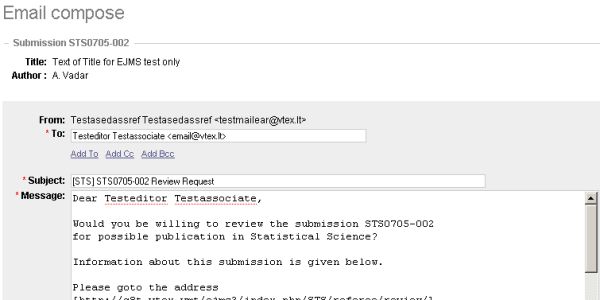
Figure 2.15: Editing an invitation e-mail to a referee.
The link in the message will let the referee to access the submission and
send in reports without logging into EJMS.
2.5 Submissions in review
In the same way as it has been described in Section 2.2
for New submissions, you can track progress and manage submissions which are currently In review (see Figure 2.16).
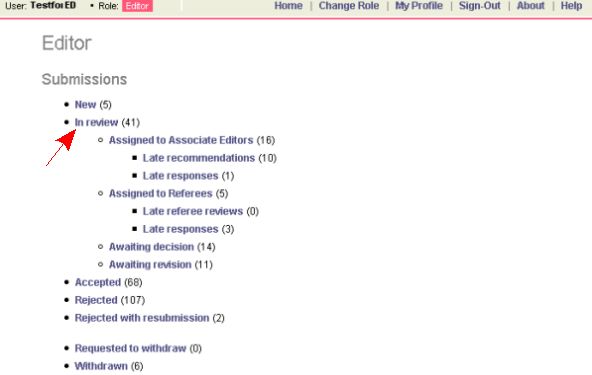
Figure 2.16: Submissions screen.
The category In review has several subcategories, as described in
Section 2.1. There are items begining with word “late” - they
could need more attention. EJMS can be configured to send automatic
reminders in case of late responses or recommendations. In fact, it is
possible to have two kinds of reminders: the first one being “gentle” and the
second - “more strict”.
2.5.1 Track the review progress
The Submission screen and Review tab in it allows to see
review status of a selected submission: assigned Associate Editors and/or
Referees, already submitted recommendations, comments and reports from
them. Emails tab lets you access a means of communication for the
submission.
Let us give you some examples, how the Submission screen changes during
peer-review process. Figure 2.17 shows the view after two
referees were invited by an associate editor.
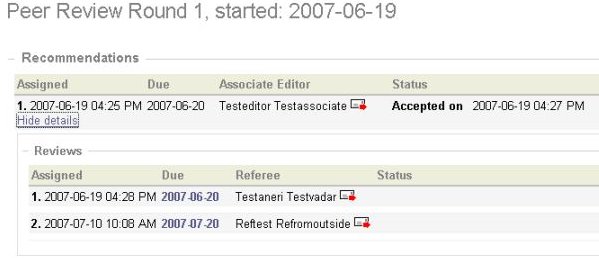
Figure 2.17: The associate editor has invited two referees.
When submissions get to the stage requiring your action, you will receive an
e-mail from the system, for example, when the recommendation has been
completed, like shown in Figure 2.18. Then you may even
assign a new associate editor, like in Figure 2.19.
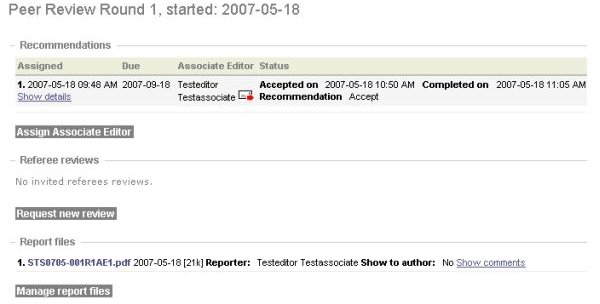
Figure 2.18: The associate editor has submitted a recommendation (no referees were invited).
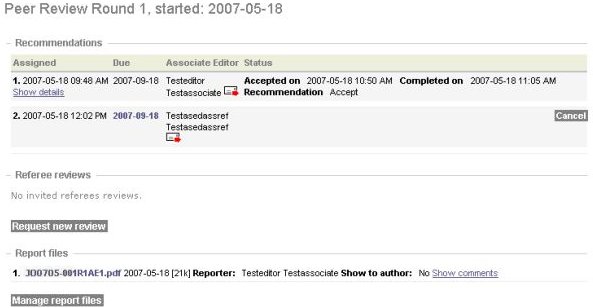
Figure 2.19: Another associate editor is being assigned for the same submission.
When reports and recommendations related to the submission appear in the
system, the Submission screen gets more options: to download
the reports (the file names are active links to the files, like in
Figure 2.20), to view comments and show/hide details
(like in Figure 2.21).
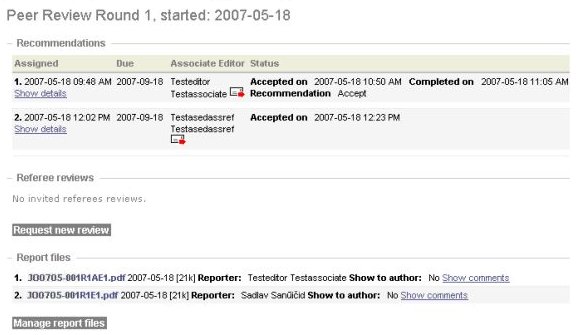
Figure 2.20: Reports were submitted by the referee and the associate editor.
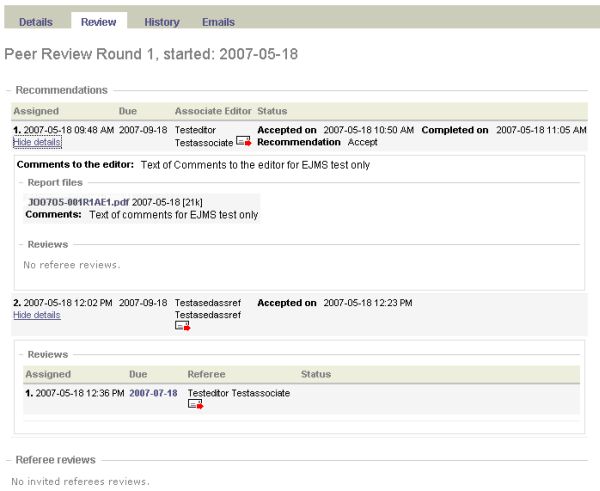
Figure 2.21: Show details expands information in the same Submission window.
2.5.2 Change of the due date
You can change the due date of a task in the Submission screen’s
Review tab. Click on the date in the Due column (see Figure 2.22).
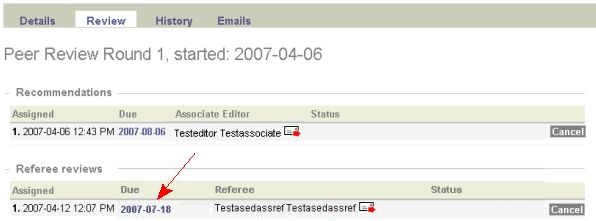
Figure 2.22: Change of the due date.
Then correct the date in the Due field of the form, like in
Figure 2.9.
2.6 Manage report files
All uploaded reports are shown on the Manage report files screen.
There are two tables: Report pool and Reports for Author(s). Press
‘+’ in the first table to permit the author to view the report
(see Figure 2.23). The report line will appear in the
second table. If you decide to suppress the author from reading the
report, press ‘-‘ in the second table - the report file will
disappear from there.
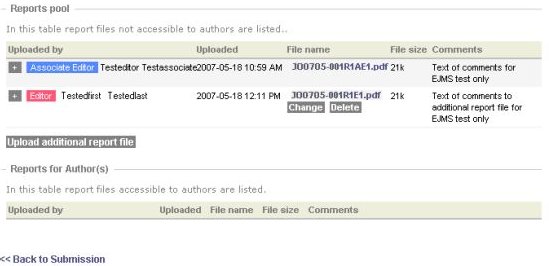
Figure 2.23: This form is used to indicate which reports could be seen by authors.
2.6.1 Upload an additional report file
From the Manage report files screen you can upload your report
files. This can also be used for reports received by e-mail
outside the system. Upload additional report file link opens
a simple file upload form (see FigUre 2.24).
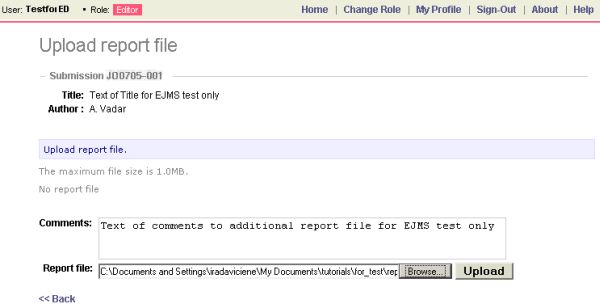
Figure 2.24: Report upload form.
Click on Browse button to locate the file on your local computer, write a
few words in the Comments field, explaining the authorship and the purpose of the report
(for example, ‘’Notes for the author’‘, or ‘’Referee report to the
editor’‘), and click Upload.
2.7 Manage supplementary files
In applied sciences, it is becoming usual practice to electronically publish
articles with some ralated supplementary material. This kind of material has to be reviewed together with a
manuscript. As the authors can also submit other kinds of
additional files besides the main manuscript, it is the responsibility of the
Editor to sort out what should be published as a supplementary
material.
In a similar way, as is the case with reports, it is planned to soon
implement the management of supplemental files.
2.7.1 Upload of additional supplementary files
For the moment, Journal Manager has the right to upload additional
supplementary files when the review process has already been started. This can be
necessary, for example, if reviewers need some additional material from
authors to complete their reviews. Another example is when the
Author has agreed with the Editor to update the manuscript.
2.8 Time for your decision
After all assigned tasks have been completed, the submission is
waiting for your decision.
2.8.1 Submissions awaiting decision
Submissions with all tasks completed are reachable through the link
Awaiting decision (see Figure 2.25).
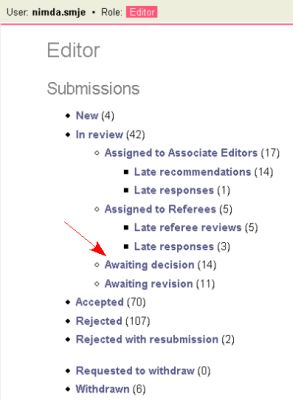
Figure 2.25: Submissions’ screen.
In the Submission screen of a single submission, under the
Review tab you will find the buttons (like in Figure 2.18)
which let you continue the review process:
Assign Associate Editor, Request a new review and Manage report files.
They all were explained above.
Another couple of buttons lead to the end of one review round or the whole process: Record Decision and
Withdraw submission.
2.8.2 Record decision
In order to register your decision within the system, click
Record decision on the Submission screen under the
Review tab. Choose one option from the drop-down menu (see Figure 2.26,
under Decision:):
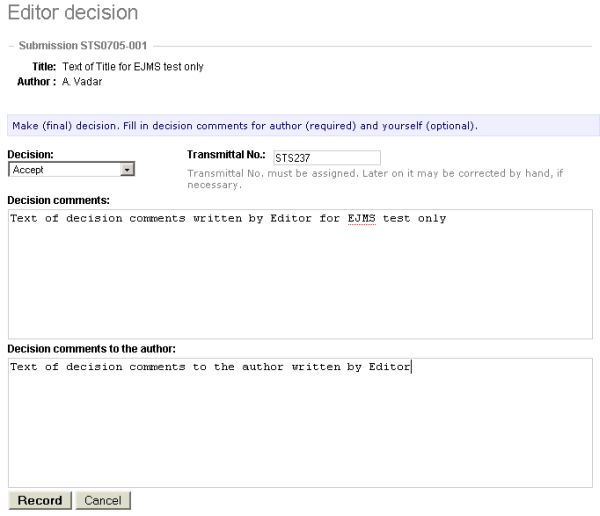
Figure 2.26: The decision form.
- Accept;
- Require minor revision;
- Require major revision;
- Reject with resubmission (revised manuscript will be treated as a new submission);
- Reject.
After that write your comments to the Author and press the Record button.
The same list of decision options is used by Associate Editors and
Referees. At the moment, the list of options is fixed. If your
journal does not need some of the options, the current advice is not to use
them and respectively instruct the reviewers.
2.8.3 Edit e-mail to the author
In the end, a screen with the e-mail message to the authors will be opened
for editing (see Figure 2.27).
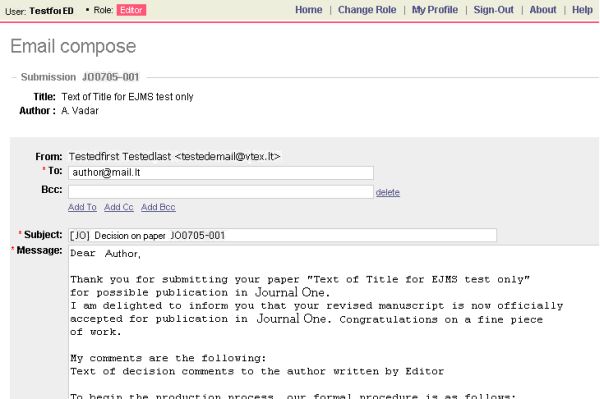
Figure 2.27: Edit e-mail to the authors.
2.9 Submissions after decision
Submission, after their peer-review process has been finished, are collected in
list categories Awaiting revision, Accepted, Rejected,
Rejected with resubmission and Withdrawn (see
Figure 2.28).
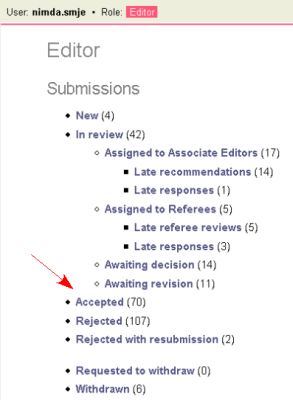
Figure 2.28: Submissions screen.
The tables in these submission categories show the decisions made in the review process, see
Figure 2.29 for example.
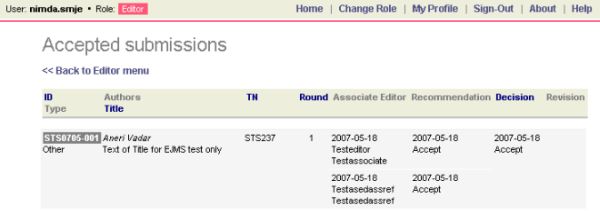
Figure 2.29: A submission table in the accepted submissions category.
All the information about a submission - metadata, files,
reports, comments, emails - is accessible from within the
Submission screen. It can be accessed from the category list screens by
clicking on the submission’s ID (as usual).
3. Associate Editor’s Guide
3.1 All submissions
Once you have logged into the system and selected the Associate Editor
role, you are brought to the Submissions screen (see Figure 3.1).
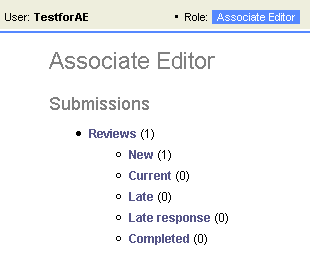
Figure 3.1: The Submissions screen for Associate Editor.
On the Associate Editor’s Submissions screen you can see
the list with several categories, where all the submissions are grouped by their
status (not in display order):
- Reviews contains all submissions, which were assigned to you;
- the New ones are waiting for your task acceptance/rejection;
- Late response ones are those assigned submissions that you are being late to accept/reject;
- all the Current ones are in the review process;
- and the Late ones are still not done after the due date has passed;
- already Completed reviews.
When a review task has been assigned to you, the submission appears in the
category New. It will stay there until you accept or
reject (or the Editor will cancel the assignment) the task. If you do not respond, after
some predefined time it will also appear in the Late response group
(and then you could receive automatic reminder e-mails, if they are enabled).
The Current category contains reviews you have agreed to manage. If
one of them stays there for too long, it will also appear in the
Late category (this could also be signalled by reminder e-mails).
Only Completed reviews do not require any actions from Associate Editor - the
submissions can stay there until they are archived.
3.1.1 Submissions’ categories
To perform an action related to a submission, you need to open its
Submission screen. This can be done from any status category where this
submission is listed (Reviews contains them all). To open any of
the category screens, just click on their name.
The displayed table mirrors the review progression - as it goes on, the lines
of a particular submission will contain more and more information: dates, names and
decisions. The action of accessing any of the submissions individually is
always the same: just click on ID. Figure 3.2 shows an
example from New reviews (the ID is pointed to by an
arrow). You should click it to find all the submission details and to respond
with your decision about the review task acceptance.
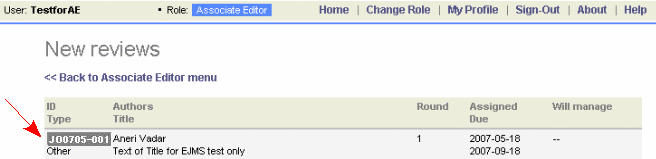
Figure 3.1: A submission in New reviews.
In the following example from Current reviews, two
referees were assigned for the submission (see
Figure 3.3). One of them has not reported his decision
yet. For full information on the submission’s review, you have to click
on the submission’s ID.
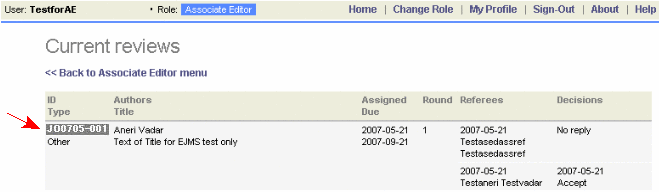
Figure 3.3: A submission in Current reviews shows the status of its review process.
Figure 3.4 shows a submission in the table of already
Completed reviews. No referees were involved in the review, the
decision was ‘’Accept’‘.

Figure 3.4: A submission in Completed reviews.
3.2 View submission details
You may first go through the manuscript by clicking on the Details tab
(see Figure 3.5).
You will find all information on the manuscript and authors.
By clicking on the file name (pointed by an arrow) you
will be able to open it for a quick look or to save it to your disk for
later reading.

Figure 3.5: View details of the submission and access its files.
By clicking on the History tab, you can see your actions and decisions
regarding this submission made in the previous rounds, if there were any.
3.3 Accept review assignment
You have to make a decision whether to accept the review
assignment or not by pressing the appropriate button (Yes or
No) on the Task screen (see
Figure 3.6). EJMS will automatically compose an
e-mail (and open it for editing, see Figure 3.7)
notifying the Editor, who has invited you to review the submission,
about your response.
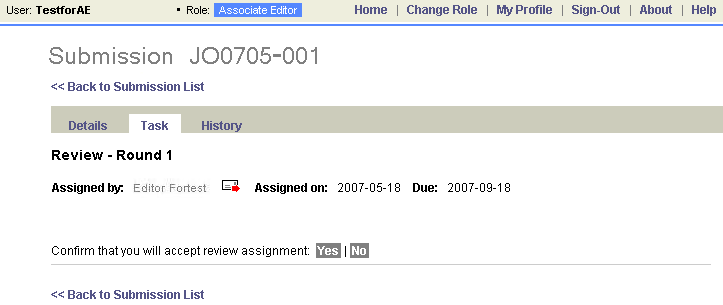
Figure 3.6: Accept or reject the review task.
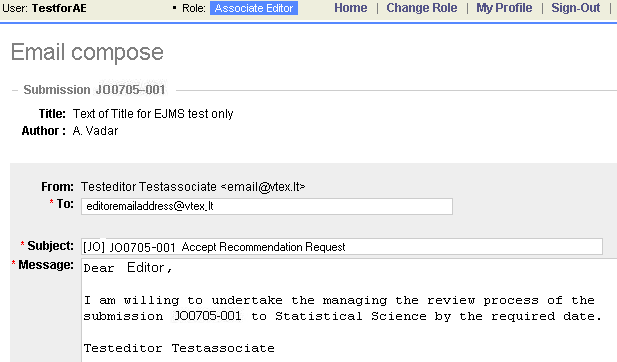
Figure 3.7: Edit your response message about the task acceptance.
After the task is accepted, the next step within the system is either to
invite referees or to upload your recommendation.
3.4 Invitation of a referee
If you wish to invite a Referee to review a submission, you have to follow these steps:
- Access the submission you want to deal with, i.e., open its Submission screen;
- Select the Task tab;
- Click on Request new review (see Figure 3.8).
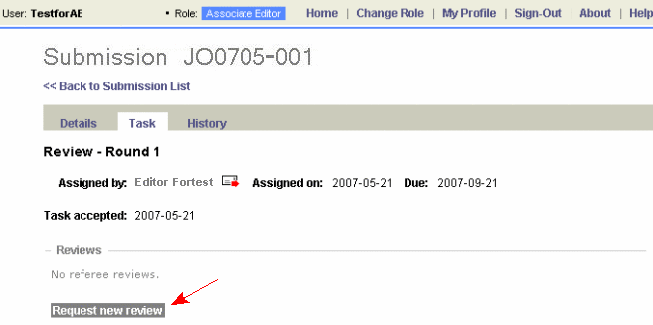
Figure 3.8: Click on Request new review.
For further instructions see Editor’s Guide in Section 2.4.
3.5 Current review management
You may need to change due dates, cancel and reassign review tasks to
referees for one or another reason. All this can be done within the
system.
Any submission under review is reachable by the Current link (see
Figure 3.9). After clicking it you will get to the
Current reviews screen (Figure 3.3), which shows
the status of the submissions, for example, recommendations from
Referees.
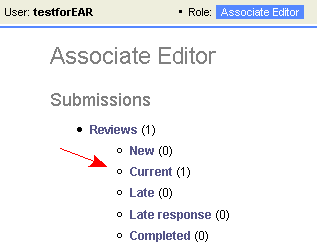
Figure 3.9: Click on Current.
After selecting the submission in the table, you get to its
Submission screen, from where the main actions with the submission can
be performed.
3.5.1 Change the due date for review
If the Referee accepts the task, you should get his report within defined
amount of time. You can find the option to change the default due date
of a review in the Submission screen’s Task tab (see
Figure 3.10). Click on the date in the Due column.
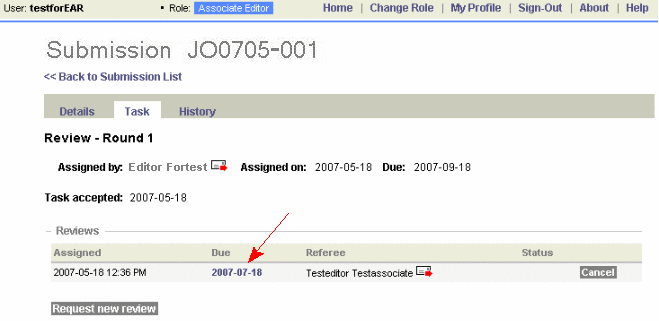
Figure 3.10: Click on the due date if you wish to change it.
Input another due date for the review in the Due field (see
Figure 3.11) instead of the default one, if you need.

Figure 3.11: Edit the date and click on Continue button.
After clicking on Continue button, an e-mail to the selected
Referee will be composed.
3.5.2 E-mail from the referee - review completed
After the Referee uploads the review and records a recommendation an e-mail
is generated to the Associate Editor, like in
Figure 3.12.
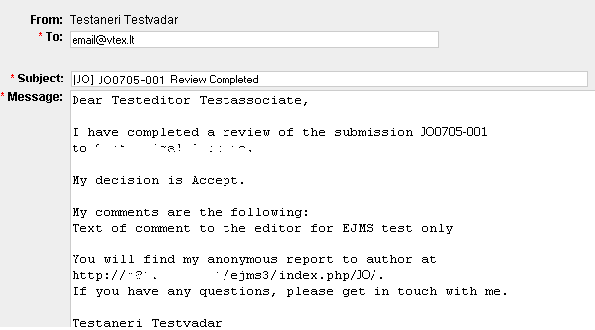
Figure 3.12: Example of a message from a referee about a completed review.
3.5.3 View referee’s report
You can see the details of the Referee’s recommendation on the
Submission screen after going to the Task tab (see
Figure 3.13). You can find the
Referee’s report there and download it by clicking on the file name.
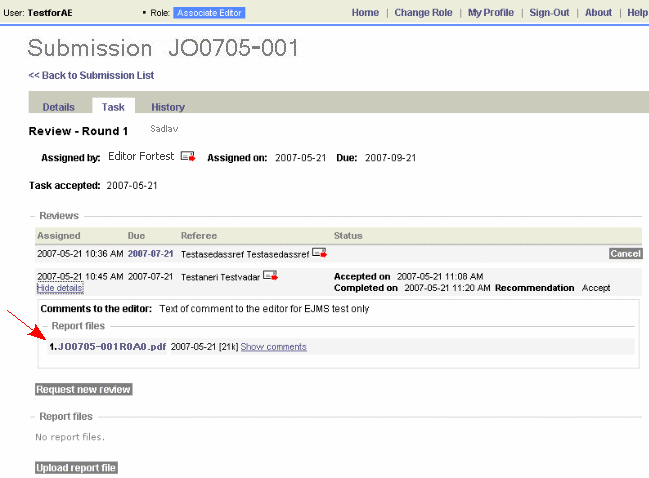
Figure 3.13: It is possible to check the recommendation, download the report, cancel the task, and request a new review.
3.5.4 Cancel the task
When you assign a task to a Referee, you have to wait for an answer
about acceptance of that task. If the Referee does not answer for a
long time, you may cancel the assignment from the Submission screen by
clicking on Cancel (on the right side of the table in
Figure 3.13). After canceling the task you
may also delete it from the list of the tasks.
By clicking on Request new review you may ask a new
Referee to review the submission.
3.6 Recommendation and report
If you (or the referees) have prepared the review report(s) and you are
ready to make a recommendation, then your need to finish the task in the
system:
- Access the submission’s screen and go to the Task tab (see Figure 3.14);
- Click on Upload report file and upload the report (see details in Section 3.6.1);
- Click on Record recommendation and enter your decision and comments (see details in Section 3.6.2).
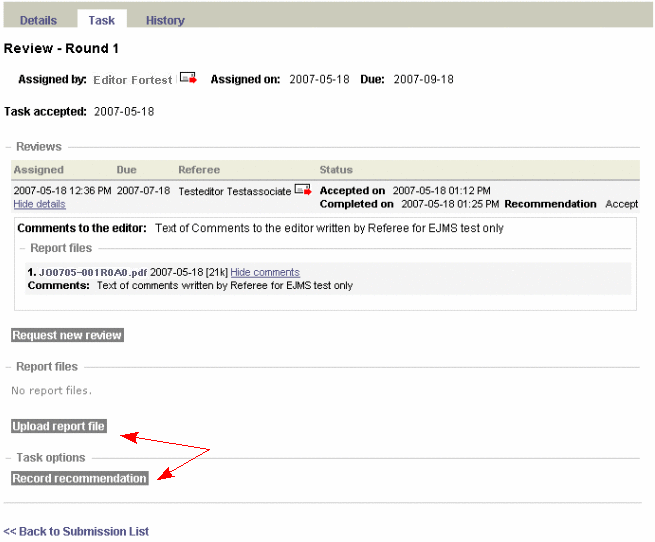
Figure 3.14: Finish the review task.
You are asked to submit your own report before the date shown in the
Due column.
3.6.1 Upload a report file
The report can be uploaded from your computer after clicking
Upload report file on the Submission screen (see
Figure 3.14) - this will open the file-upload form.
You may write the file name in the form field or click Browse to
locate the file in your system. Multiple reports may
be uploaded.
If you have received reports by e-mail from the referees, who are not
using EJMS, then you have to upload them to the system yourself with the
comments indicating that the report has been received from a referee.
You must upload all reports before making a recommendation. For each
report, a new file name is given by EJMS. The Editor may choose
whether or not to make any report(s) visible with the decision to the author.
3.6.2 Record recommendation
After clicking on Record recommendation (see
Figure 3.14), you will have to choose one option
from the drop-down menu (see Figure 3.15):
- Accept.
- Requires minor revision.
- Requires major revision.
- Reject. You should be as clear and as specific as possible regarding the reasons for rejection.
- Reject with resubmission. The revised manuscript will be treated as a new submission. You should be as clear and as specific as possible, regarding the reasons for rejection and the ideas in the paper that may lead to something acceptable for the Journal.

Figure 3.15: Choose your decision and write comments.
Now add your comments in the Comments to the editor field and
press the Record button. Your report will be sent to the Editor.
These comments will not be seen by the author of the submission.
3.6.3 Compose an e-mail to the Editor - recommendation completed
The system composes an e-mail message and opens it for your final editing,
see Figure 3.16.
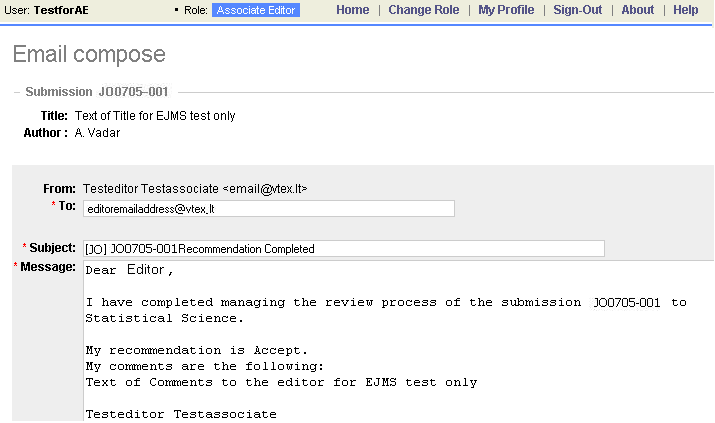
Figure 3.16: Edit message about completion of the review task.
3.7 Completed reviews
After you have completed the task, the submission’s information can be
found among Completed reviews, see Figure 3.17.
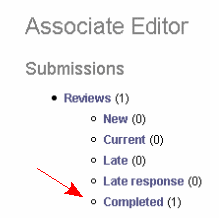
Figure 3.17: The Submissions screen.
A click on the Completed link will bring you to the
Completed reviews screen (like in Figure 3.4).
After clicking on the submission’s ID you will be able to
see all the final information about the completed review with all the necessary
details - see an example in Figure 3.18.
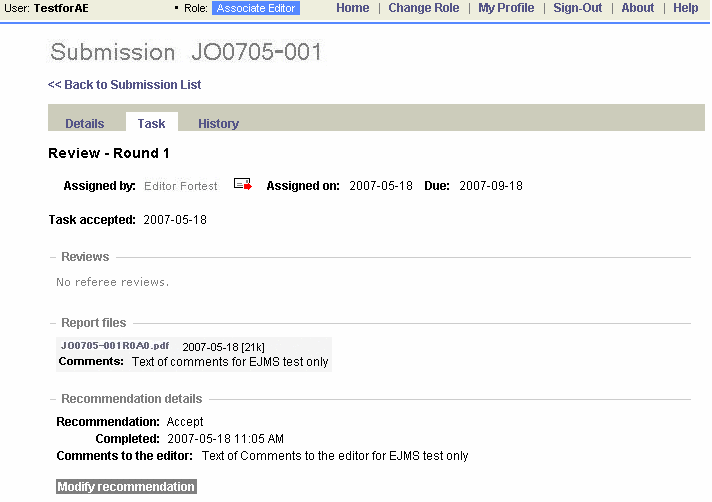
Figure 3.18: View of a completed review.
Modify recommendation allows to change your decision
until the moment the Editor enters his own decision into the system.
4. Referee’s Guide
4.1 All submissions
Once you have logged into the system and selected Referee role, you are brought to the Submissions screen (see
Figure 4.1).
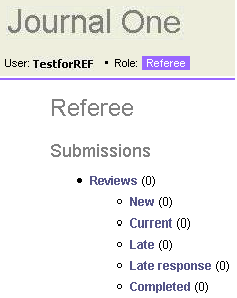
Figure 4.1: The Referee’s Submissions screen.
On the Referee’s Submissions screen you can see a list with
several categories, where all the manuscripts are grouped by their status (not
in display order):
- Reviews contains all submissions, which were assigned to you;
- the New ones are waiting for your task acceptance/rejection;
- Late response ones are those assigned submissions that you are being late to accept/reject;
- all the Current ones are in the review process;
- and the Late ones are still not done after the due date has passed;
- already Completed reviews.
When a review task has been assigned to you, the submission appears in the category New.
It will stay there until you accept or reject (or the Editor will cancel the assignment) the task.
If you do not act, after some predefined time it will also appear in the Late response group
(and then you could receive automatic reminder e-mails, if they are enabled).
The Current category contains reviews you have agreed to manage. If
one of them stays there for too long, it will also appear in the
Late category (this could also be signalled by reminder e-mails).
Only Completed reviews do not require any actions - the
submissions can stay there until they are archived.
4.1.1 Accessing submissions
To perform an action related to a submission, you need to open its
Submission screen. This can be done from any status category where this
submission is listed (Reviews contains them all). To open any of
the category screens, just click on their name.
The display form of all submission tables is similar,
Figure 4.2 shows an example from All reviews screen,
accessible by clicking the Reviews link.
After clicking on ID (pointed by the left arrow), you will get to
the Submission screen. In the beginning it looks like this
Figure 4.3.
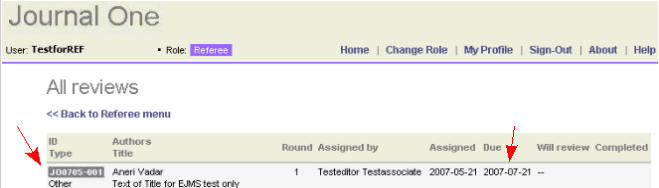
Figure 4.2: Check the due date and access the Submission screen.
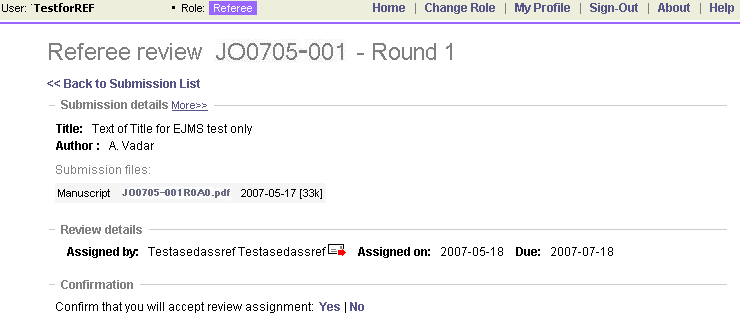
Figure 4.3: Submission screen for a new task.
4.2 Preparing reviews
You have to submit your reports until the date shown in the Due
column (see Figure 4.2).
The work order with each submission is quite obvious:
- Look at its details (metadata) and content (Section 4.2.1);
- Decide whether you will review it and inform about that the inviting editor as soon as possible (Section 4.2.2);
- If you decided to review the submission, prepare the reports for editors and for authors and upload them (Section 4.2.3);
- Record your recommendation (Section 4.2.4).
4.2.1 View submission details
You may first go through the manuscript by clicking on Details tab
(see Figure 4.4). There you will find all the information on the
manuscript and authors. By clicking on file name (pointed by an arrow) you
will be able to open it for a review or to save it to your disk for
later reading.
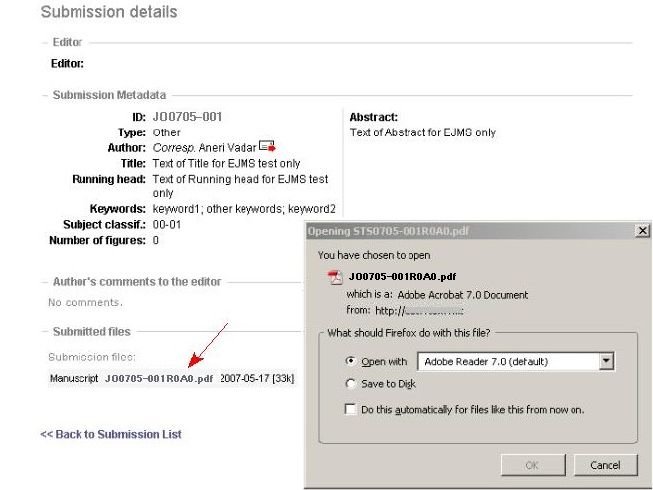
Figure 4.4: View the details of a submission and access its files.
4.2.2 Accept review assignment
Then you have to inform the inviting editor about your decision to accept or to reject the
review assignment by pressing the appropriate button (Yes
or No, see Figure 4.3).
EJMS will automatically compose an e-mail (and open it for editing, see
Figure 4.5) to notify the Editor, who has invited you to
review the submission, about your response.
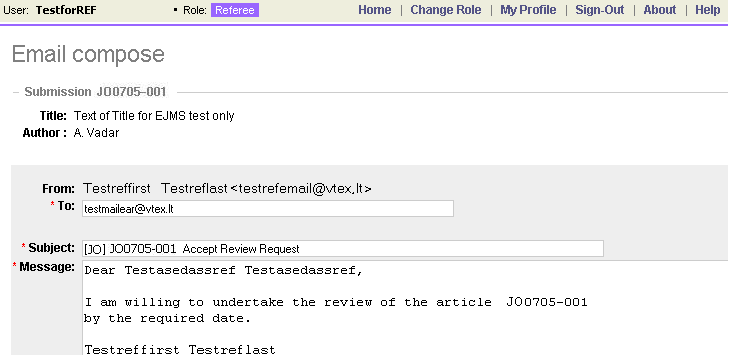
Figure 4.5: Edit your message about the task acceptance.
After the task acceptance, Submission screen will look like in
Figure 4.6; there are possibilities to access the
submission files, upload your reports, and to record your recommendation.
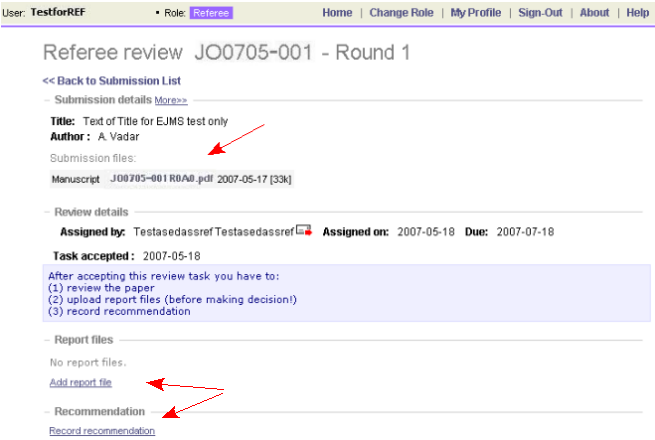
Figure 4.6: Submission screen after an accepted task.
4.2.3 Add a report file
Reports can be uploaded by clicking on Add report file
link (see Figure 4.6) - then the upload form will be opened,
like in Figure 4.7.
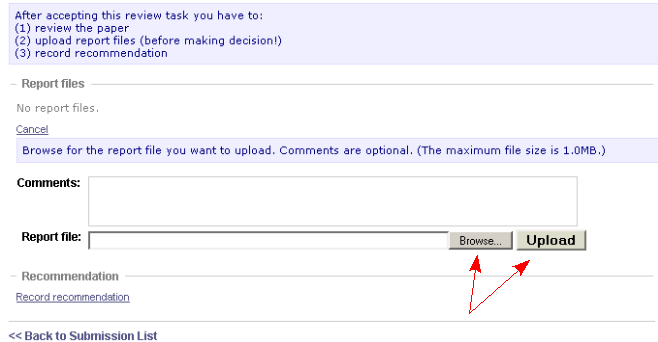
Figure 4.7: Upload your report file.
Browse for the report file you want to upload, then click on
Upload button. Please indicate in the Comments field what
is in the uploaded file, for example “Remarks for editors” or “Comments
to authors”.
In case the file might be seen by the authors, please check that the word
processor does not leave your personal information in the binary file (what
MS Word or OO Writer often does, also in PDF format).
Multiple reports may be uploaded. You must upload the reports before making
a recommendation. Your report will be given a new file name by EJMS. The
Editor may choose whether or not to make any report visible to the author
together with the decision.
4.2.4 Record recommendation
After the report files have been uploaded, you can go on to record your
general decision by clicking on Record recommendation link (see
Figure 4.8).
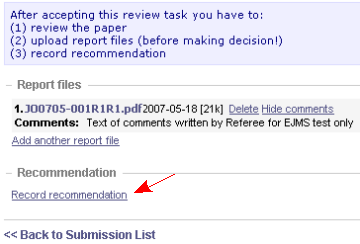
Figure 4.8: Part of the Submission screen after the reports have been uploaded.
The recommendation form is shown in Figure 4.9. There is a
drop-down menu to choose from available decision options and a comment field.
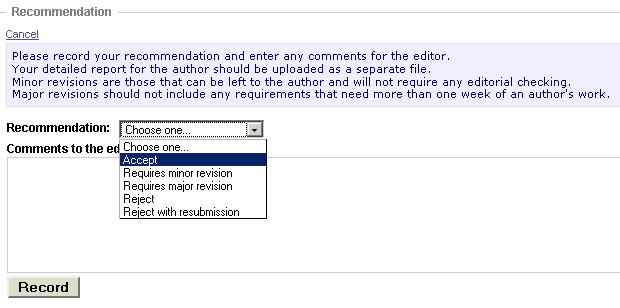
Figure 4.9: The recommendation form.
Decision options are the following:
- Accept.
- Requires minor revision.
- Requires major revision.
- Reject. You should be as clear as and specific as possible regarding the reasons for rejection.
- Reject with resubmission. The revised manuscript will be treated as a new submission. You should be as clear and as specific as possible, regarding the reasons for rejection and the ideas in the paper that may lead to something acceptable for the Journal.
Now add your comments in the Comments to the editor field
and click on Record button. Your report
will be sent to the Editor. These comments will not be seen by the author
of the submission.
The system composes an e-mail message and opens it for your final editing,
like in Figure 4.10.
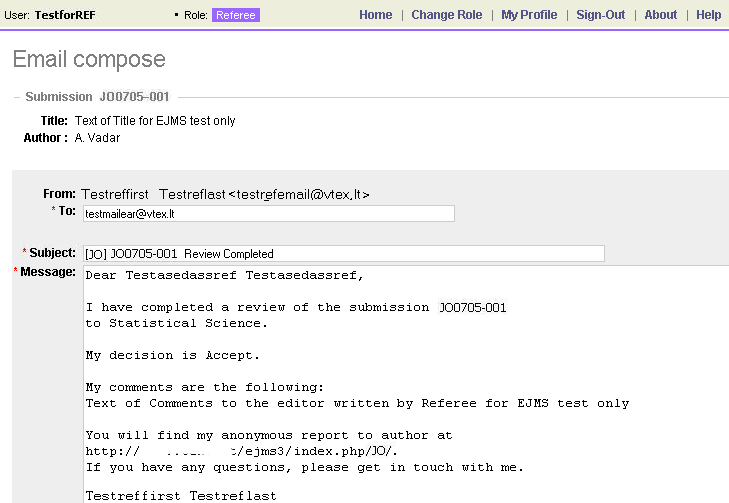
Figure 4.10: Edit message to the editor.
5. Author’s Guide
5.1 General
Once you have logged into the system, you are brought to the Home (Roles)
screen (see Figure 5.1). You will see the name of
the Journal and available role(s) you can take up in the system.
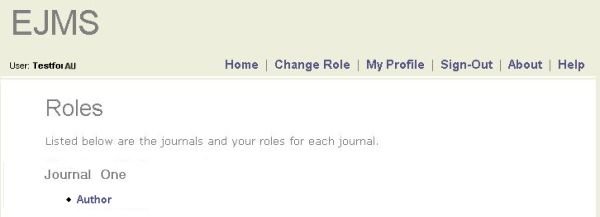
Figure 5.1: The Roles screen.
Clicking on the Author role will bring you to the Author’s
screen listing different states of the submissions in the system
(see Section 5.1.1).
To register with another journal (or to add roles in the same journal) click
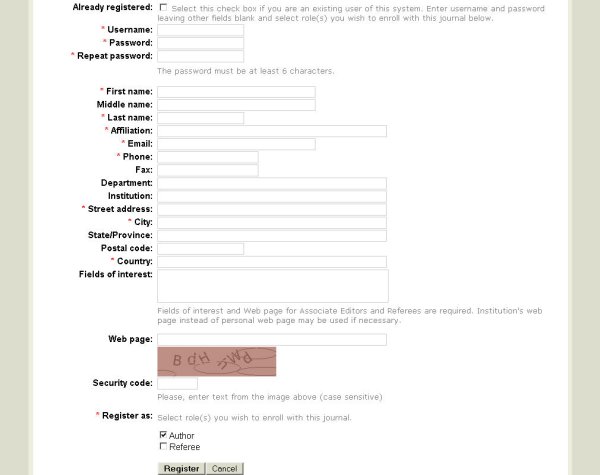
on Registration in the Login screen (see Figure 5.2).
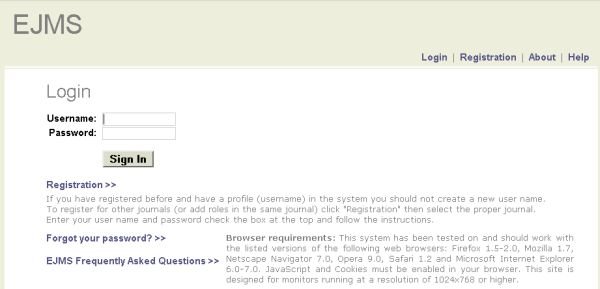
Figure 5.2: Register with other journals or add roles.
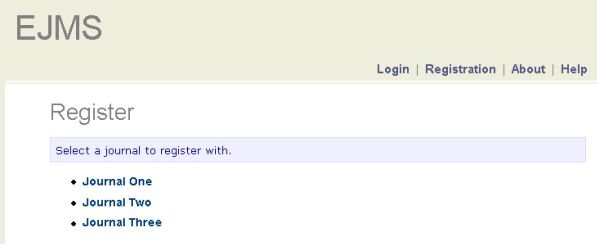
Then select the journal (if there are more than one).

Figure 5.3: The list of journals to select from.
Enter your user name and password, check the box Already registered at
the top and follow the instructions.
5.1.1 Submissions screen
On the Author’s Submissions screen (see
Figure 5.4) you can see the list with several categories, where all the
manuscripts are grouped by their review status:
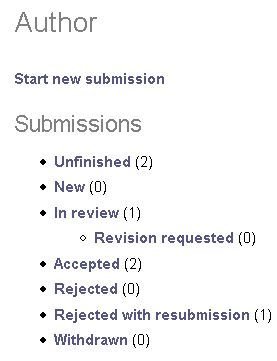
Figure 5.4: Submissions screen.
- the Unfinished ones waiting for further actions to complete the submition;
- the New submissions waiting for the first action of the Editor;
- already In Review process;
- with Revision requested by the Editor;
- already Accepted to publication in the Journal;
- Rejected;
- Rejected with resubmission;
- Withdrawn for some reason.
After the manuscript is submitted to the system, it first appears in the
New submissions group. Once the review process has begun, the
submission can be accessed from the In review category on the
Submissions screen. It will move out of this there when a decision
is made by the Editor. Then the corresponding author will be contacted by e-mail,
so there is no need to check the system very often.
The lists of submissions inside the groups look very similar and the
actions to be done in order to find detailed information on a certain
submission are the same. Therefore, only a few groups with some special
features or additional possibilities will be described separately.
5.2 Submitting a manuscript
5.2.1 Start a new submission
To submit a new manuscript, you should click on Start new submission
in the Submissions screen.
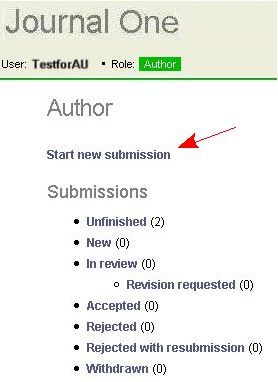
Figure 5.5: Start a new submission.
From the New Submission interface you submit all the data that
comprises your manuscript: text, images, and descriptions. You have to go
through four steps to enter all information about the manuscript. At any
time during the submission process, you can return to any earlier step to
edit the information there by clicking the appropriate tab on the steps’ bar shown
at the top of the New submission screen.
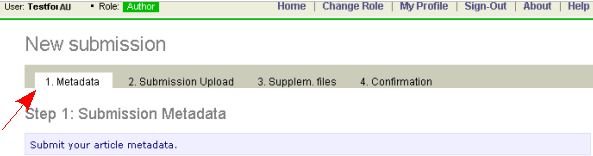
Figure 5.6: Submit metadata.
Step 1: In Step 1 you have to submit
your article metadata - article details which
will be useful in the peer-review process. This information (e.g., the
abstract, keywords, etc.) must appear and coincide with the ones in your
manuscript. Mandatory fields are indicated by an asterisk (see
Figure 5.7). If you do not know all the details required in the form
of Step 1 you can suspend your submission by clicking on the Finish later
button at the bottom of the screen. Then all already entered metadata will
be saved. To resume your submission, you have to log into the system,
follow the for Unfinished submissions on the first Author’s screen, find
your submission in the Submission list and click on Resume
(see Section 5.2.2 of this guide for details).
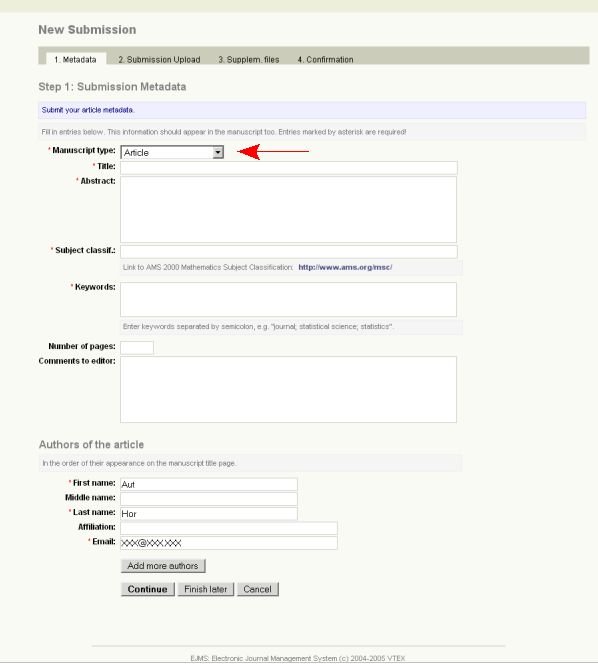
Figure 5.7: The form to submit metadata.
First, from the drop-down menu select the Manuscript type that
best describes your manuscript (pointed by an arrow on the picture above).
Possible types are the following: Article, Discussion,
Rejoinder, Conversation, Special invited paper,
Lecture and Other. Article is the default type.
Type or copy and paste the Title and Abstract. Instead of
special characters, the corresponding LaTeX commands should be used if
necessary (e.g., \infty instead of
infinity sign, etc.). Please avoid using complex formulas in your
abstract because they can make the paper unreadable through online searching results.
Enter subject classif -ication codes (if required) and
keywords, with consecutive keywords or codes separated by
semicolons. A link to AMS 2000 Mathematics Subject Classification will help
you to choose correct classification codes. You may select as many
classification codes and keywords as you see appropriate for the manuscript.
Enter the total number of pages in your manuscript (including the
bibliography) into the next field. You also can enter any comments
you would like to send to the Editor. These comments do not need to appear
in your manuscript. This is also where you may suggest potential referees
for your paper.
Next, you have to enter all the Authors who have contributed to the
manuscript. If you are the only author, you just have to verify the
information at the bottom of the screen (the information from your
profile is listed here by default). If you are not the only author, you have to add other
authors by clicking the Add more authors button and indicate a
Corresponding Author. Authors should be entered in the order in which they
appear in the manuscript. Only the Corresponding Author will receive e-mail
notifications from the system. If the person indicated as the Corresponding
Author is not you, he must be a registered EJMS user, as he will be
contacted during the peer-review process. Other Authors do not need to be
registered within the system, but the details in the actual manuscript will
be used to check if they correspond to the submission.
First name, last name as well as e-mail fields are
required (see Figure 5.8). Affiliation information is
not a required entry, but it will aid an Editor, who will have to select
Referees not affiliated with the authors of the manuscript.
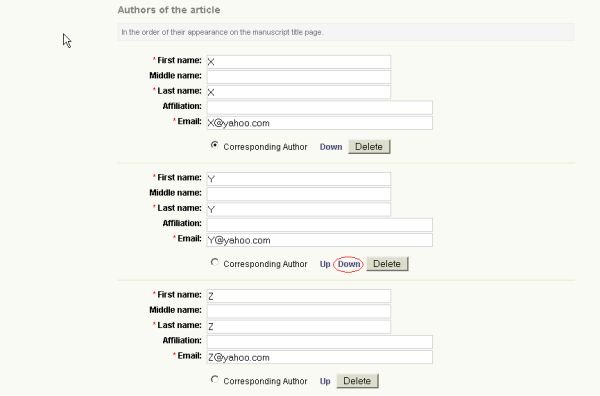
Figure 5.8: The form to enter the author(s) of the manuscript.
Authors have to be listed in the same order as they appear on the
manuscript title page. By default, you are the first author, but you can
change the order of the authors by clicking on Up and
Down links below their information fields. One click transposes two
adjacent authors. For example, if three authors X, Y, Z are entered in the
order XYZ, and the first and the third authors are to be exchanged, then
three transpositions are necessary: XYZ >> XZY >> ZXY >> ZYX.
You can delete any erroneously entered author by clicking on the
Delete button below the author’s information.
To finish the submission of metadata step and move to Step 2, you have to click
on Continue button at the bottom of the screen. If all mandatory fields
are filled in correctly, it will bring you to Step 2. At any time during
the submission, you can come back to Step 1 and edit the metadata by
clicking on 1. Metadata in the Submission Steps bar shown at the
top of the screen.
To cancel your submission, you have to click on Cancel at the
bottom of the screen. In this case, all entered metadata will be lost.
Step 2: When uploading a submission, You must provide it in PDF format. If your source file was
created using Word or WordPerfect processors, you may use OpenOffice, Adobe
Acrobat or some other software to convert it to PDF format file. If
these programs are not available to you, click on the Help link in
the upper right corner of the screen and send an e-mail to the Technical Support Contact.

Figure 5.9: The form for file upload.
To upload the manuscript file, click on the Browse button (see
Figure 5.9) to locate the manuscript file on your system or enter
the file name (with full path) in the field manually. Then click on the
Upload button to start uploading the manuscript file to EJMS. The size of
the manuscript file cannot exceed 10~MB. If the required file does not
exist or you made a mistake in its name or path then “Error not found”
box will appear on the screen (see Figure 5.10). If the system
detects that the indicated file is not a PDF file, a red bar with an error
message “Please submit a PDF format file” will appear on the screen. In
both cases, you have to browse for your file again or reenter the correct
file name.
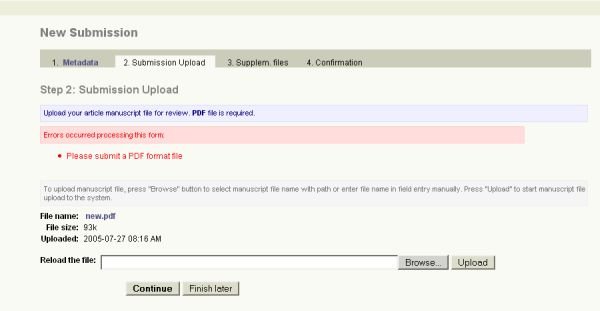
Figure 5.10: File upload error.
If your manuscript file was uploaded successfully, the corresponding
message on a green background will appear on the screen (see
Figure 5.11). By clicking on the file name, you can open and check
the file. If a wrong file was uploaded, you have the ability to browse
again for the correct file and reupload it. The previously uploaded file
will be replaced by the new one.
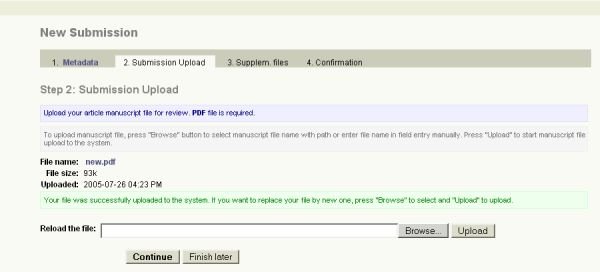
Figure 5.11: Successful file upload.
To go to Step 3 click on Continue at the bottom of the screen or
to finish your submission later - just click on the Finish later
button. At any time during the submission you can get back to Step
2 and reload your file by clicking on 2. Submission Upload in the
Submission Steps bar shown at the top of the screen.
When going through Steps 2-4 you cannot cancel your submission anymore (like you could
in Step 1). If, for some reason, you want to cancel the submission and remove it
from the system, you should:
- click on the Finish later button;
- go to the Author’s Home screen and select Unfinished submissions;
- delete your submission from the submissions list by clicking on the Delete button.
Step 3: Upload of supplementary files. In addition to your manuscript PDF file, you may upload any supplementary
files (e.g., separate art files, code, data and other accompanying files). Please
do not upload the source file; you will be asked for a source file only at
the end of the peer-review process, if your article is accepted. If you do
not intend to upload supplementary files, click on the Continue
button, which will bring you to Step 4, or click on Finish later
to have a possibility to resume your submission next time.
Clicking on Add a Supplementary File will bring you to
Step 3a.
Step 3a: Uploading supplementary files is very similar to uploading the
manuscript PDF file. However, you have to enter a short metadata for each
supplementary file. Namely, you have to provide a Title and a
Brief Description (both fields are mandatory, see
Figure 5.12). As you will notice, file names in EJMS are different
from ones on your computer; therefore, the title will be used to
identify semantically the exact file among all supplementary files. The
brief description should give a short information about the
supplementary file and explain teh purpose of including this file into your
submission.
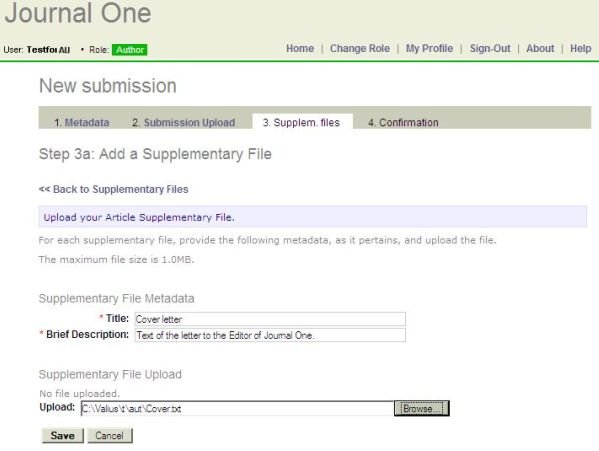
Figure 5.12: Upload form for supplementary files.
After entering the supplementary file metadata, click on the
Browse button to find the file on your system (or enter the file
name and the path in the field manually) and click on Save to start
supplementary file upload. After successful upload, you will see a list
of supplementary files. You may:
- Open and check any file by clicking on its name;
- Delete any file by clicking on Delete beside that file;
- Replace any file by another version by clicking on Edit beside that file;
- If all supplementary files are uploaded, go to Step 4 by clicking on Continue at the bottom of the screen.
- Cancel the upload of supplementary files by clicking on Cancel (all files already uploaded will remain in the system).
At any time during the submission process you will be able to get back to
Step 3 and add supplementary files by clicking on 3. Add a Supplementary File
in Submission Steps bar at the top of the screen (see Figure 5.13).
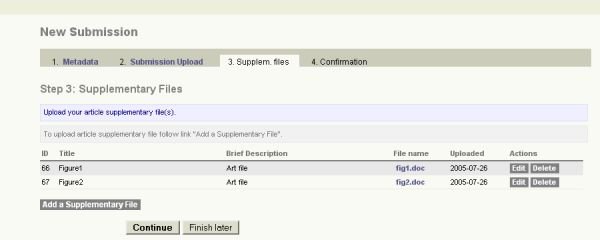
Figure 5.13: Some uploaded supplementary files.
Step 4: Confirmation. Review the data of your submission to ensure that all the requested
information has been provided (see Figure 5.14). If you need to add
something or if you found a mistake, you can go back to any step by
clicking on the step name in Submission Steps bar at the top of the screen.
Once satisfied, click on Finish Submission to submit your
manuscript to the Journal. You will receive an acknowledgment by e-mail. To
view your article’s progress through the editorial process you need to log
in and go to In review category of the list in the Author’s
Submissions screen. After that, click on the submission’s ID.
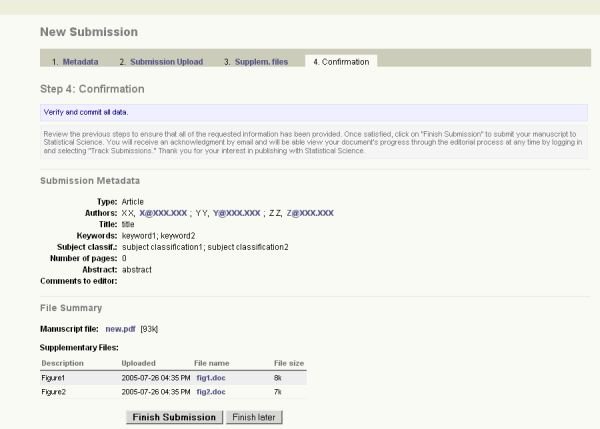
Figure 5.14: Check the metadata and confirm.
Remark In New Submission Step 4 screen, original file names are
listed. When you access your submission’s information from a certain
list category on Author’s Submissions screen, you see your files
with the names stored in EJMS.
5.2.2 Unfinished submissions
When you click on the Unfinished link in the Author’s
Submissions screen, you see the table containing all your manuscripts,
whose submission you have postponed by clicking on Finish later
while submitting (see Figure 5.15). ID is not assigned to such
manuscripts until their submission is completed.
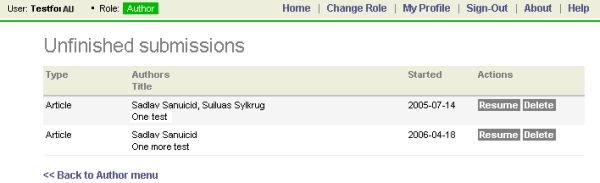
Figure 5.15: List of unfinished submissions.
In order to cancel any of those submissions, you may click on
Delete in the Actions column and then confirm deletion with OK.
To continue the submission, click on Resume. Then you will be able to complete
your submission starting again from the same step the submission was
terminated. EJMS has saved all the earlier entered data and now will restore it.
It is also possible to review the information about any of the completed submissions
by clicking on its ID in the Submissions screen. The
Submission screen will then appear (see Figure 5.16). It
shows all the uploaded files with the names used to store them in EMJS.
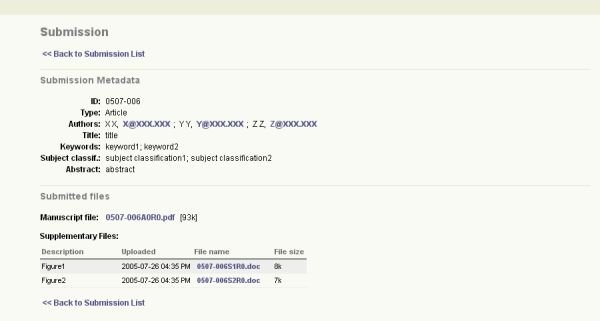
Figure 5.16: Check a completed submission.
5.3 Tracking submissions
To view your article’s progress through the editorial process you need to
log into the system and go to a appropriate list category on the
Author’s Submissions screen.
After that, click on the submission’s ID to view the information
about its current review status.
Below some examples of submission groups are given.
5.3.1 New submissions
When you click on New in the Author’s Submissions screen
(see Figure 5.17), you see the list of all your submitted manuscripts,
like in Figure 5.18.
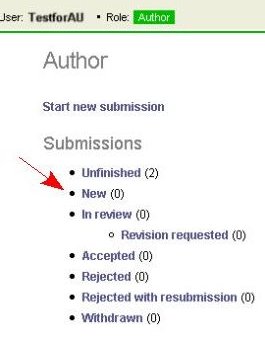
Figure 5.17: Click on the New link.
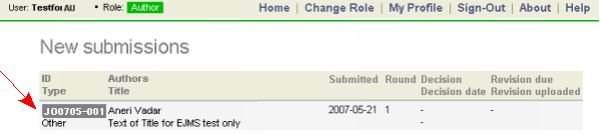
Figure 5.18: New submissions.
After clicking on the submission’s ID it will be possible to view
and edit the information concerning the submission. For more details,
please go to the section Start a new submission.
5.3.2 Submissions in review
In the same way as it has been described for New
submissions, you can view the list of submissions In review (see Figure 5.19).
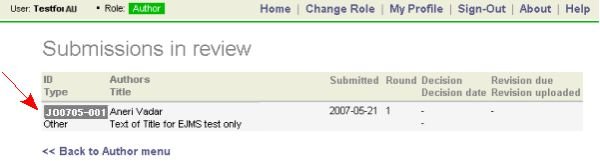
Figure 5.19: Submission in review.
After clicking on the submission’s ID it will be possible to view
the Details and the Review of the submission.
Details: By clicking on the name of the manuscript, you can open it or save it to your
disk (see Figure 5.20).
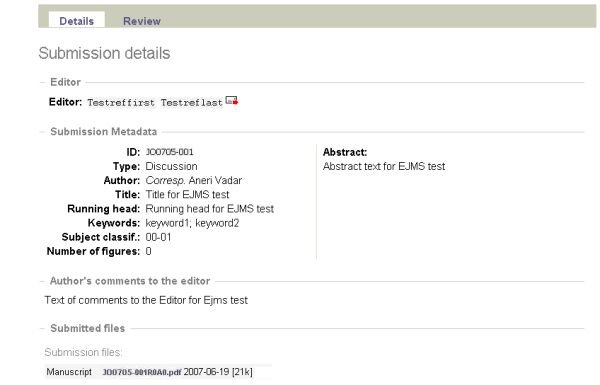
Figure 5.20: View details of the submission.
Review: If the review process has not started yet, no data will
be found (see Figure 5.21).
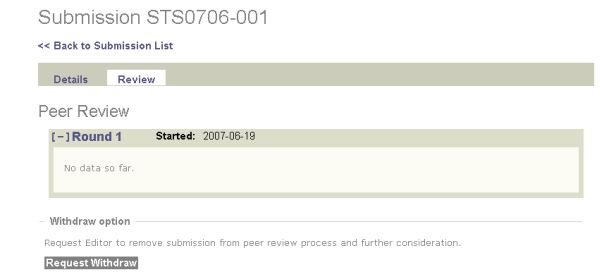
Figure 5.21: Review data in the beginning.
After the review process has begun, you may track it under the
Review tab (see Figure 5.22).
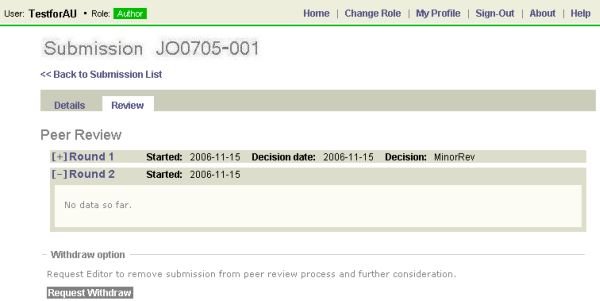
Figure 5.22: Shown data after some review progress.
If the submission is moved out of In review list, then it should
appear in other group, and the corresponding author will be informed
about it by e-mail.
5.4 Accepted submissions
After selecting the category of Accepted submissions (see
Figure 5.23) and clicking on the certain submission’s ID
you can view the date of the decision on the submission, the
decision itself and the comments to the author (see Figure 5.24). The
acceptance e-mail will provide the instructions to begin the production
process.

Figure 5.23: A submission in the list of accepted submissions.
You will be able to Request Withdraw if you
decide not to continue the work on the manuscript.

Figure 5.24: Review data of an accepted submission.
5.4.1 Minor or major revision
If the decision is that the submission requires ‘’minor’’ or ‘’major’’ revision, you will usually
see reports from the reviewers. A due date for the revision is
displayed. When you are ready to submit the revision, you should log into
EJMS and select the ID number of the original submission. You
will see a button for uploading the revision. You may also upload your
responses to the individual reviewers as supplementary files.
5.5 Rejected with resubmission
In some rare cases, your submission could be rejected with possible
resubmission - then it will appear in this list, like in
Figure 5.25.

Figure 5.25: A manuscript was rejected with possible resubmission.
In this case, your revised submission will be treated as new one. You may choose
to put down a note to the editor about the original submission in your comments’ field.
|